
Its only the third week of the year and A is already worried that we are falling behind on our resolutions. What started out as her anxiety about winter malaise ended up as a weekend filled with projects (homemade granola, bagel chips, dried kiwis, and our first attempt at no-knead bread) wedged in between outings (wine tastings, feeding our market cravings at Hillsdale, and trying new salts at the Meadow). She was definitely in one of her epicurean Laura Ingalls Wilder moods, when she wants to make everything from scratch and live off the grid, but still take advantage of all the city has to offer.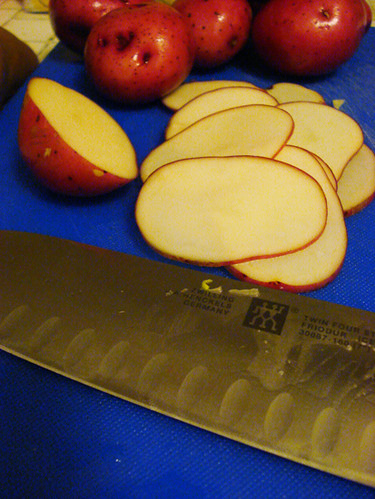 To ease back into the work week after a hectic weekend, a simple meal was in order. What simpler than the potato? While I've never enjoyed baked potatoes (that crispy skin is their only redeeming quality, don't try to convince me otherwise), can you think of a dish in which potatoes aren't delicious? They may very well be the hog of the vegetable world - versatile, satisfying, eminently tasty. Whether roasted with a little sea salt, french-fried, mashed, scalloped, twice-baked (now, those are a different story), added to a stew, stuffed in pierogi, or formed into gnocchi, the potato can fill so many roles quite gracefully.
Given the potato's easy appeal, the UN Food and Agriculture Office has declared 2008 to be the Year of the Potato, in an effort to draw attention to world hunger and issues confronting farmers. (Incidentally, it's also the year of the Rat [mine!]). Their site includes interesting reports on topics such as how Andean farmers are preserving tuber biodiversity to how potatoes can serve as an agricultural tool for women's empowerment. Even better, it provides me with more trivia for my already trivial mind (Europeans consume 96 kilos per capita annually!) and a project for growing potatoes in a large bucket. Since A and I want to expand our container gardening this year, I think this may well have made it onto our list of projects.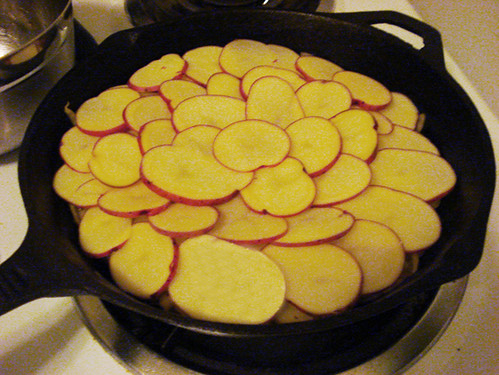 About a year ago, we came across two fantastic variations of a potato galette in an issue of Gourmet. This basic potato cake is layered with contrasting ingredients and crisped in a skillet, making a very beautiful and filling dish that would adapt well to all sorts of seasonal combinations. Morels and ramps with new potatoes in Spring, beets and their greens in the Fall, a little apple sliced in could be nice, as well. With what we had available, we knocked out a version based on a timbale recipe I'd recently seen that paired the potatoes with fennel and bosc pears. The fourme d'ambert is far too runny of a blue to be layered inside without making the whole thing stick to the pan, so crumble the cheese over the finished galette and broil briefly to melt, or just serve the hunks of it alongside the galette wedges. (If you'd like to vary the recipe and layer cheese inside the galette, good, firm cheeses like cheddar or fontina should hold up.)
___________________
Potato, Fennel, and Pear Galette with Fourme d'Ambert cheese
1 1/2 lbs. potatoes (we used red creamers for this, but deep blue potatoes worked great for the kale version we'd previously made)
6 tablespoons butter
2 garlic cloves, sliced
1 medium fennel bulb, halved and cored
1 ripe bosc pear
1/4 lb wedge of fourme d'ambert
kosher salt and fresh ground black pepper
Begin by slicing the fennel 1/8 of an inch thick. Melt two tablespoons of the butter in a cast-iron skilled over medium heat. When it begins to smell fragrant, toss in the fennel and garlic slices and saute, stirring occasionally. When the fennel is just beginning to turn translucent, season to taste with some salt and black pepper. Continue cooking until the fennel has softened and its edges have just begun to brown. Remove from heat, transferring the fennel to a bowl and wipe out skillet.
While the fennel is cooking, thinly slice your potatoes about 1/16 of an inch. A mandoline will make short work of this and keep the thickness consistent. Heat another two tablespoons of the butter in the skillet over moderate heat and, as it melts, halve, core and thinly slice the pear. There is little need to worry about browning because you will quickly assemble the galette in the pan.
Brush the melted butter around the skillet and, with any excess, brush a sheet of aluminum foil that is slightly larger than the skillet you are using. On the stove, quickly begin layering about half of the potato slices in the bottom of the hot skillet, working inwards from the pan's edge in a spiral, overlapping each previous slice. Sprinkle with cracked pepper and kosher salt. Layer the pears in the same fashion on top of the potatoes, then cover with the cooked fennel, spreading it thinly into a single layer. With the remaining potatoes, cover the fennel with a final layer of overlapping slices. Brush with olive oil or a bit of melted butter and season with pepper and salt. Place the foil butter-side-down on the potatoes and weight down the galette by placing a heavy pot that just fits inside the skillet on the foil, pressing slightly.
Cook 10-15 minutes until the bottom layer of potatoes have crisped. Remove the pot and foil from the skillet and set aside. Holding a sheet pan tightly over the skillet, flip both over together, inverting the galette onto the sheet. Take a second baking sheet and place it over the galette on the first baking sheet. Hold both tightly together and invert the galette again. Brush the potatoes with a bit of olive oil or melted butter, cover with the skillet and invert once more into the pan. Return to moderate heat and cover with the foil and stockpot for another 10-15 minutes.
If you'd like to melt the cheese into the potatoes and really open up its aroma, preheat the oven to broil, remove the foil and stockpot and crumble the fourme d'ambert over the top of the galette. Place the skillet in the oven and broil lightly, watching that it doesn't brown too much. Otherwise, just go ahead and cut healthy wedges of the galette and serve alongside slices of the fourme d'ambert.
Thursday, January 17, 2008
the simple potato
Monday, January 14, 2008
if at first you don't succeed, chai, chai again...
I've had a hankering for Indian food recently. Not your everyday, superficial, tip of the tongue need for something salty or sweet, but a deep down, pit of the stomach sort of desire. I wanted the spice, the tang, the layers of flavor that somehow remain distinct in channa masala or saag.
Indian food is something P and I have always found difficult to recreate in the kitchen. We can make pretty satisfying curries or dal, but they always seem to lack the depth you find in a restaurant. Still, we had recently discovered a dal recipe from the spice shop we visited in Montreal (found here) and decided to throw caution to the wind, feeding my hankering with a home-cooked meal.
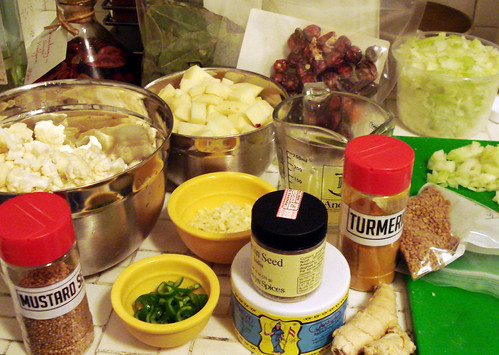
The dal needed an accompaniment, so I rooted through the only Indian cookbook we have (not a standout - this is clearly one of the areas in which our cookbooks are lacking) and found a recipe for aloo gobi, or stewed potatoes and cauliflower. Then, we rounded out the meal with a little homemade chai (recipe below) and naan.
Flushed with the success of my bread last weekend, I decided to start the year off right and outdo my own resolutions. I set out to make bread every two weeks? Seriously, that was a weak promise. In competition with myself, as I typically am, I decided to win at my own game. However, as the middle finger on my left hand had been injured earlier that day in a freak trunk-of-the-car accident, it was up to P to do the kneading. I supervised closely and must say I was pleased with his technique (Let's face it, the man can whip up a souffle from a pile of sand. He's like a modern-day king Midas - turning everything he touches into butter), but the end result was not quite up to par. This was probably due to the fact that I opened the oven after 5-7 minutes (when the cookbook indicated the bread should be finished), noted that it looked uncooked, and popped it right back in for another five. It was tasty, but more cracker-like than naan. Next time, I suppose I might follow the recipe and see where that gets me.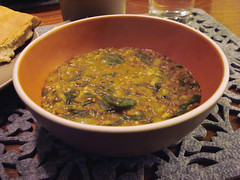 Luckily, the rest of the meal was everything I had hoped for. The aloo gobi was incredibly tangy, with a mustard bite; the chai a perfect sweet and warming complement to the spicy food. Even the naan had a great flavor and played its part well as utensil/shovel. The highlight, though, was the dal. The recipe calls for three different spice blends, to be added at different points throughout the cooking process. Toss in turmeric and bay leaf to start; cook for awhile, then add fenugreek, hot pepper, asafoetida (the resin of a middle eastern root that smells like it sounds, but gains a mellow onion-y flavor when cooked in butter) and ginger; cook a little longer, then throw in cumin, garlic, mustard seeds, and cayenne to finish.
Therein reside the secrets that catapulted this meal worlds beyond any other Indian meal we've made: more cooking, more spices, better timing. Every flavor of the dal was delicately melded together, while remaining discernible. A taste began with the bite of garlic and cayenne, eased into flavors of onion and fenugreek, and echoed with the herbal notes of the bay leaf.
I was indeed satiated.
_______________________
Easy Chai:
1 cup water
1 cup milk (we use soymilk - I like the nutty flavor)
3 tsp. black tea, such as Assam or Darjeeling (or a mixture)
3 peppercorns
3 cardamom pods, bashed
2 cloves
Combine all ingredients in a medium saucepan. Heat over medium-high heat until boiling, stirring occasionally and increasing the frequency of stirring as it gets closer to boiling. Let the liquid foam up a few times - the foam is delightful. Take off the heat and strain into a bowl or, if you trust your aim, directly into two small mugs. Stir in a big spoonful of honey (or a smaller spoonful of sugar) and you're done!
This recipe is a little milder than what we normally make, but it's a good jumping off point for experimentation. I like to make it with a little more pepper; you may prefer a stronger tea flavor, or more cardamom. Also, feel free to expand the recipe - sometimes we make 1 1/2 or two times as much and have it in a pot; other times we just want a taste and the smallish mugs work out fine.
Friday, January 4, 2008
resolutions
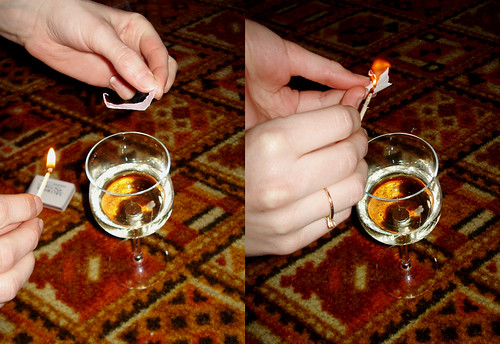 To ring in this new year, our friend Kathleen introduced us to a great tradition, the details of which I probably only partially paid attention to. What I remember of it is that you write all of your resolutions on a small scrap of paper, burn it over your glass of champagne and gulp down the wine, ashes and all. I think it began in some Eastern European country where the locals likely initiated the tradition in order to keep warm. When you have nothing left to throw on the fire, what is there? Your hopes and dreams for the next year! Set 'em alight! I'm not going to get too caught up in the potentially awkward symbolism of burning your promises - let's all just focus on the part of the custom where you ingest and internalize your wishes. And - bonus! - we didn't accidentally set fire to anything else (sorry Marty and Chuck - this could have been your chance to replace the carpet at the beach).
A and I both took a particularly long time writing out our resolutions because this year we made ourselves sit down and actually think about what we wanted to accomplish over the next 365 days. Inevitably, we got long-winded. What resulted probably says more about our respective personalities than about our goals:
P's resolutions:
-preserve more foods
-improve my baking
-read more often (and more of the books I've been putting off)
-commute more by bike
-experiment more with letterpress
-learn about new food cultures
-use our cookbooks more
-expand our gardening
-explore more of the city
A's resolutions:
-jar tomatoes and sauce
-bake bread once every two weeks
-read at least two nights a week
-have more plants and tend to them better
-volunteer with Slow Food
-buy a chord book & tuner and pick up the guitar again
-go climbing once a month
-blog post once every two weeks
Looking over our two lists, we resolved to do many of the same things, but the differences in approach are revealing. Whereas I would craft broad directives (read more), A would set tangible benchmarks (read two nights a week). Sure, mine may be a little vague or subjective, but let's face it; they're easier to claim success at. Still, whenever we'd ask friends about their resolutions, we kept noticing how similar ours actually were. Instead of our task-oriented ideas, others would mentioned lifestyle or character-changing goals like "living more healthfully" or "taking a more relaxed approach to life." In every instance, A and I wrote about specific activities that could propel our lives in a new direction, while most of our friends declared resolutions that were more end goals of how they'd like to see themselves. Funny. I guess A and I aren't much into building character.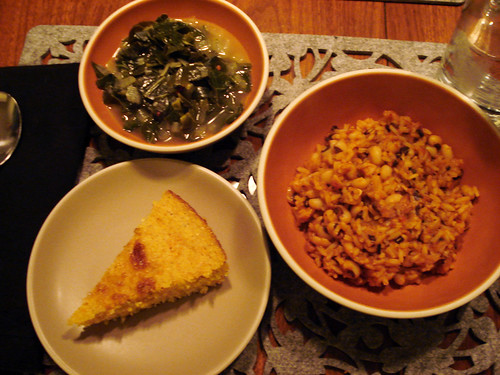 So, to make sure that we had full bellies prior to starting all of our projects (seriously, canning and baking really work up an appetite), we decided to start off the year with a great, warming, Southern, and luck-filled new year's day dinner - hoppin' john, collards, and skillet cornbread.
We turned to the Lee Bros. again for inspiration and were not disappointed. Baking the cornbread in a skillet gives it a great crusty exterior that matches the coarse-ground bite of the cornmeal. The leftover stock from our "bog" played beautifully in the hoppin' john alongside the fresh-soaked black-eyed peas and the smoky richness of the ham hock. Cooking your black-eyed peas from scratch will get you over any aversion you may have had to the canned variety (isn't it true of most foods?). Originally, we'd planned to make our collards based on a recipe from Russell Street BBQ - the broth-y, stewed variety with plenty of onions and garlic. But given the winning streak we'd been on with the recipes from the Lee Bros. (4 for 4!), we decided to take a few hints from both sources and make our own tangy, spicy version. We left out the ham (trust me, there was more than enough to go around from the hoppin' john) and it didn't suffer at all - done with a homemade vegetable broth it would be a satisfying vegetarian side.
_______________
New Year's Day Collards
(adapted from Lee Bros. Southern Cookbook & Russell Street BBQ)
2 tablespoons olive oil (or 1/4 pound slab bacon)
1 cup sweet onions, chopped
2 cloves garlic, thinly sliced
2 large bunches collard greens, stemmed, washed and cut into 1/4 inch strips
2 cups good (homemade) chicken or vegetable stock
1/4 teaspoon crushed red pepper flakes
2 tablespoons cider vinegar
1/2 teaspoon sugar kosher salt and freshly ground black pepper to taste
1. Heat the oil in a 6-quart pot or render the bacon (3-5 minutes) over medium-high heat. Add the onions and cook until translucent and soft.
2. Lower the heat to medium and toss the garlic with the onions a few times until fragrant.
3. Add 2 handfuls of collards at a time, turning them in the fat and onions for a couple of minutes until they wilt; just steam them in the small amount of water that clings to them, but don't let them brown [make sure to constantly stir them]. Add more collards, 2 handfuls at a time, and turn them until they wilt, until all the collards are wilted in the pan.
4. Add the chicken broth and red pepper flakes. Turn the heat to medium-high and cook until the broth comes to a simmer. Reduce the heat to low, cover, and cook until the greens have turned dark, about five minutes.
5. Add the vinegar and sugar to the greens, toss to distribute, and cook, uncovered, about 5 minutes more to let the cooking liquid reduce and concentrate.
6. Season with salt and pepper and serve hot with cornbread.
________________
Wednesday, January 2, 2008
bog vs. bread: the battle royale
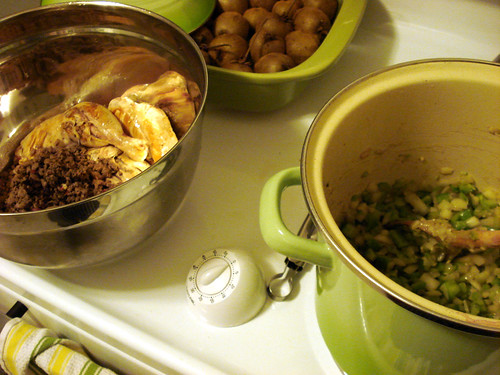 Since P was sick last weekend, we decided to have chicken soup for dinner. Of course, a little sore throat never got anyone out of anything, so P cooked most of the "chicken bog" (our inaugural recipe from the Lee Bros. Southern Cookbook) himself. For all who are wondering, chicken bog is a fantastically rich stew made with a whole chicken (including the giblets), sausage, green peppers, onion, chile, red wine, etc., etc. Because making this incredible soup was not enough, P also made the chicken stock (recipe also from the Lee brothers) that was the base for the "bog."
As my contribution to the healing process, I baked my first ever hand-made bread (no bread machine, mind you). The results were so thrilling that I was giddy for a couple of hours afterward. [It's true - she kept talking about how she was going to start making bread every day - P] I challenged my bread (recipe below) to his chicken bog; hence the name of this post. As a testament to the strength of our relationship, we agreed that the soup and bread worked better as a team than as a rivalry.
____________________
Basic Bread recipe (adapted from Jamie Oliver's Happy Days with the Naked Chef)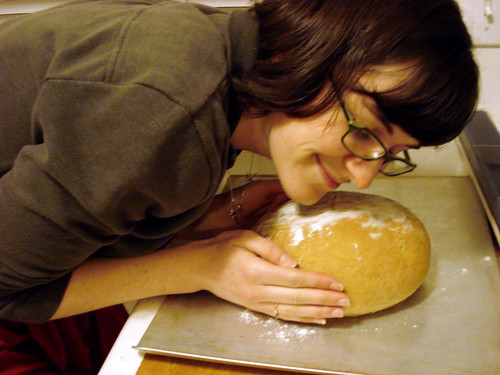
3 1/2 cups white flour
3 1/2 cups organic wheat flour
2 1/4 cups tepid water
3 1/4oz packets active dry yeast
2 tablespoons sugar
2 level tablespoons sea salt
extra flour for dusting
Stage 1: Making a well
Pile the flour on a clean surface and make a large well in the center. Pour half your water into the well, then add your yeast, sugar and salt and stir with a fork. (I chose to start this process in our Kitchenaid, rather than on the counter. Maybe not as "naked" as Jamie might have liked, but I could mix the ingredients with considerably less mess...)
Stage 2: Getting it together
Slowly, but confidently, bring in the flour from the inside of the well. Continue to bring the flour into the center until you get a stodgy, porridgey consistency - then add the remaining water. Continue to mix until it's thick again, then you can be more agressive, bringing in all the flour, making the mix less sticky. Flour your hands and pat and push the dough together with all the remaining flour. (Certain flours need a little more or less water, so feel free to adjust.)
Stage 3: Kneading!
This is where you get stuck in (his words, not mine). With a bit of elbow grease, simply push, fold, slap and roll the dough around, over and over, for 4 or 5 minutes until you have a silky texture and elastic dough. (Again, I started the kneading process with a dough hook in the mixer, then took it out and kneaded it by hand for awhile.)
Stage 4: First Rise
Flour the top of your dough. Put it in a bowl, cover with plastic wrap, and allow it to rise for about half an hour until doubled in size - ideally in a warm, moist, draft-free place. (I let the dough rise for more like an hour and a half. As if it were my baby, I obsessively monitored it all afternoon.)
Stage 5: Second Rise, Flavoring and Shaping
Once the dough has doubled in size, knock the air out for 30 seconds by bashing it and squashing it. You can now shape it or flavor it as required - folded, filled, panbaked, whatever - and leave it to rise for a second time for 30 minutes to an hour (or another hour and a half) until it has doubled in size once more. When it looks like the bread is getting close, you can go ahead and preheat your oven (350 degrees).
Stage 6: Cooking your Bread
Very gently place your bread dough on a flour-dusted baking sheet and into a preheated oven. Don't slam the door or you'll lose the air that you need. Bake in a preheated oven at 350 degrees for about 30 minutes until lightly golden. Move to a drying rack and allow to cool for half an hour before using.
_______________
This bread was deliciously home made - nice browned crust/fluffy and chewy interior. Great sandwich bread and perfect with the "bog." Of course, it wasn't bakery quality, but a friend of mine swears by the famous no-knead recipe that really does look like it popped out of a professional oven (and tastes like it too). I think I shall make that next. Sandwich bread for weekdays, bakery bread for fancy meals. Ah, the life of a baker.


